6.29.2010

Welcome baby

Hiya!
So I looked through my folders, and found one card I can share with you today. Hope you like it. :)


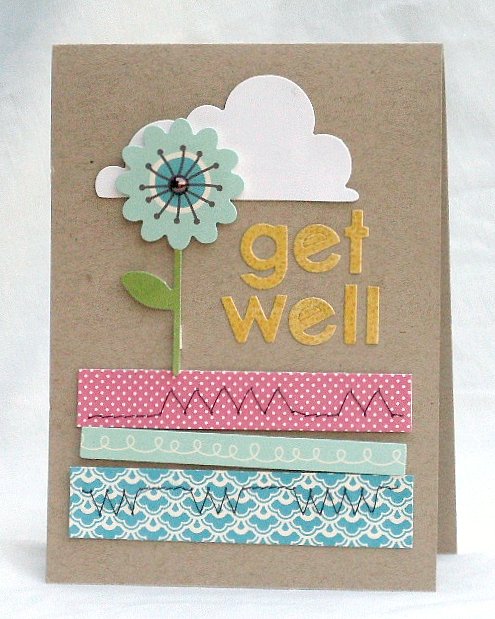
The green may look yucky in this photo, but it really looks like the green in the photo below...


Used some DCWV paper that I bought a long time ago - when the only paper lines I knew about was DCWV and Bazzil....ah, the dark ages. ;) As you can also see, my sewing machine is still broken, but in this case, I like the affect of the hand stitching.

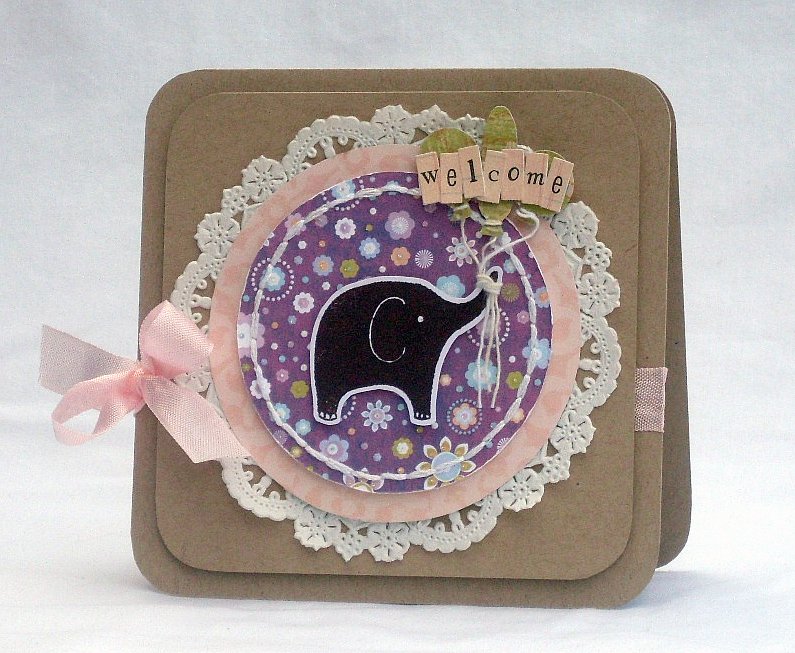
Instructions: Trim card base and kraft centerpiece. Cut patterned papers out. Hand stitch glitter patterned paper near sides. Cut balloons out and cut/adhere strings to bottom. Stamp image, and trim. Tie balloon strings around elephant trunk. Adhere doily onto kraft centerpiece, than, using foam squares to separate each layer, adhere pink paper and glitter paper. than adhere elephant and balloons onto papers. Add alphabet stickers. Tie bow around card base, and top with embellished kraft centerpiece using foam squares.


Hope you had a nice weekend, and thanks for popping in!

*******************************
Welcome card recipe
Cardstock: Bazzil
Patterned paper: DCWV "Pocket Full of Posies", K&Company
Stamp: Hero Arts "Elephants"
Ink: Colorbox
Stickers: Making Memories
Ribbon: Hug Snug
Other: string, embroidery floss, doily

Tools: scissors, trimmer, adhesive, foam squares

6.26.2010

Update

Hiya!
I just wanted to let you know why I might not be posting regularly for short period; I'm still making cards, but mostly for DT assignments so I can't show you right now, but I'm starting to get some other cards made that I hope to share with you soon.
I also have some videos, but for some reason the computer is having problems uploading them. I'll keep trying, and will post them as soon as I can.
One last thing; I've started dying my own seam binding, some of which you can purchase HERE for a reasonable price. Some pictures...


Well, that's pretty much it - hope your day is along beautifully and have a great weekend!! :)

6.23.2010

get well

Hi there!

Bonus post! ;)
A quick card that I made awhile ago using some October Afternoon paper. I hope the photo isn't too fuzzy - our monitor broke, so we're using an old one right now that is VERY fuzzy, so I can't tell if the photo is fuzzy or sharp. :(


Instructions: Cut out the paper strips and sew. Attach paper strips, cloud image and letters to card base. Using foam squares, adhere flower image and sticker strip to card base. Attach half pearl to center of flower image.

That's all for today - thanks for popping in! :)

*********************************
get well card recipe
Cardstock: Bazzil
Patterned paper: "Fly a Kite" by October Afternoon
Stickers: "Fly a Kite" shape stickers by October Afternoon
Letters: Crate 
Half pearl: Basic Grey
Other: thread

Tools: adhesive, trimmer, scissors, foam squares, sewing machine

6.22.2010

With Gratitude

Hello!

An "old" card today (when my good ol' sewing machine was working) - I was/(am) still trying to figure out how to work my darn camera, and so the photo is kinda weird.
Oh, and before I forget, I was inspired by THIS card.
And now, on to the dedication:
I humbly dedicate this card to my blog readers and to my SSC and HA (it regretfully doesn't have any HA stamps on it though) friends - your encouragement and support means more than you'll ever know! :)


Made my own flower using the Cosmo Cricket Everafter ribbon - just place adhesive on some cardstock, and place on end of the ribbon in the middle. Twist and turn, shaping the flower. Finally, tuck the edge underneath the ribbon against the adhesive. I saw another way of just holding the flower while turning/shaping it, but I find sticking it to the adhesive keeps it together and is easier for me to twist. Also, use STRONG adhesive - the flower fell off a few days later (held only intact because of the pin), and I had to go back with some really strong adhesive.
Instructions: Adhere patterned paper strips to base, and sew. Next, cut out Nestabilities shape, tracing, with a pen (or stamp) the outlines. Stamp sentiment, add pearls, flower, and buttons. Stick pin through flower, and adhere embellished Nestabilities to card base using foam squares. Finally, cut out flower petals, and adhere to flower, than adhere button.

I hope to have another video tutorial for you soon, but I'm having troubles uploading it to YouTube, so it's a work in progress.

Thanks for stopping in, and as always, for the sweet comments!

******************************

Gratitude card recipe
Cardstock: Bazzil
Patterned paper: October Afternoon "Fly a Kite", Crate paper, Cosmo Cricket "Girl Friday"
Ribbon: Cosmo Cricket Everafter
Buttons: Sassafras, chipboard buttons unknown
Half pearls: Kaisercraft
Other: thread, pin, cotton twine, pen

Tools: trimmer, adhesive, scissors, sewing machine, Nestabilities, Cuttlebug

6.19.2010

Fun in the Sun - join us!

Hello!
Just a quick post reminding everybody of the SSC Fun in the Sun party!! We're having loads of fun already, and would love it if you would join!
And now I will explain my special call to my HA friends - not only are they incredibly talented, but I know some of you gals have the "Be Happy" clear stamp set which would be perfect for my challenge which is bug inspired, and you can view it HERE. There's an awesome RAK up for grabs!!
Here is my take;


My sewing machine is broken, and since I needed this card in a hurry, I sloppily stitched the bottoms of the brown cardstock.

Instructions: Cut out paper base and center. Stamp images onto dark brown paper, and then stamp bees and flower leaves onto patterned paper for paper piecing. Add bee images and leaves to dark brown center. Make rolled paper flower, and attach to top of flower stem. Stitch ends of brown paper. Adhere embellished brown paper to kraft base. Distress edges. Add nail polish to bee wings for shine.

Anyways, hope to see you at the party!!

******************************
Bee There card recipe
Cardstock: Bazzil
Patterned paper: October Afternoon "Thrift Shop" and "Fly a Kite"
Stamps: Hero Arts "Bee Happy"
Ink: Colorbox, Staz-on
Other: embroidery floss, nail polish

Tools: scissors, trimmer, adhesive, pin


6.17.2010

Hi butterfly

Hiya!
Finally, a new project to share with you!
This one I made yesterday, after I got my goodies from SSC - Dear Lizzy ribbon and Tattered Angels mist, and than using some products I found at Michaels the day before, and my inspiration was the current Embellish challenge.


From Michaels, I used a decorative cloud edged scissors, which Tracy finally coaxed me into getting with all the pretty cards she made using it (oh, and $.50 price helped a little too ;)). The half pearls are by Recollection - yay! My local Michaels and Joann's didn't carry any half pearls until now, so I had to buy all my half pearls online, which was expensive because I didn't have coupons and had to pay shipping.

Instructions: Cut cardstock base, brown paper, and yellow paper. Cut top of yellow paper with cloud scissors. Using another sheet, cut yellow paper to fit chipboard letters, adhere, and then spread nail polish over for shimmer. Sand edges. Spray with glimmer mist. 
Stamp butterflies and cut out; add half pearls.
Adhere scalloped yellow paper to cardstock, and than add brown paper. Adhere letters to brown paper, than add floral ribbon near the bottom of the card. Add half pearls to butterfly centers, and half pearls to top of brown paper.

Thanks for popping in!

***********************
Hi butterfly card recipe
Cardstock: Bazzil
Patterned paper: Making Memories recycled packaging, DWCV Green Stack
Stamp: Martha Stewart
Ink: Martha Stewart
Ribbon: Dear Lizzy from American Crafts
Half pearls: Recollections
Other: nail polish, chipboard letters

Tools: scissors, adhesive, trimmer, sandpaper

6.16.2010

Fun in the Sun preview

Hello there!
Thank you so much for your comments on my last card - really made me smile! {smiles goofily} I hope to return the compliments as soon as I can. :)

I am hoping to get back into the blogging swing soon. I've just had a bunch of things going on; my sister recently became engaged to her BF, I am learning how to drive, our dishwasher broke down which means cleaning, by hand, all the dishes from three meals a day for all eight of us, and a million other things, including preparing for....(drum roll)...Simply Scrapping Crafts Fun in the Sun Summer Kickoff!

Above flier made by my uber talented, ultra sweet, hilarious DT sister, Amy. 

I will be hosting a challenge, to which I invite everyone to participate in, but I'm sending out a special call to my Hero Arts friends to please "bee" (hint hint) there! And if my begging you to come isn't enough, how about a sneak peek at the awesome prize up for grabs?....


It's times like this I almost wish I wasn't on the DT! So many goodies to be won! And this is only for MY challenge - we have six other challenges with more awesome prizes!

HERE is the link - I hope to see you there!

6.11.2010

Doodle bird

Hi!
Just thought I'd pop in to let some of you know I am still here; I lost my mojo for about a week or two, and so I was too sad to post anything. I made a CAS this morning which I hope (fingers crossed!) has gotten me back on track, and though I won't share it with you today, I will share a card I made last night...without my mojo. {sigh}


I doodled the background, which was surprisingly fun. I usually don't doodle, because, well, I can never think of anything to doodle. However, with my October Afternoon Shape Stickers by me, I had enough inspiration and so doodled away. Simply added the bird and little note (which I also doodled), placed it on the card base, and oila. This card is just for/like me - a little sketchy, can be bland at times, but sometimes, randomly, I'll pop in with something fun.
Hope you enjoy your weekend!

6.07.2010

Pearly Thanks

Hello there!

Today's card was made using a SSC Stamp and Scrap challenge, which I can't quite recall the details of, except that it was a recipe. I had never tried a recipe before, but seriously, this was SO easy and fun. I mean, really fun.


Instructions;
Print out the flower on red cardstock three times; one for base, and two for petals, then using Sakura gel pen, added a little detail. Cut out the two strips of Thrift Shop paper, and sewed them together. Stamped the sentiment onto the bottom half, and added the half pearls. Cut out the Nestabilities shapes, and add the flower. Tied the ribbon around the cardstock. Distress.

Sorry the photo is so poor - I took this a month or two ago, when I was still trying to figure out how to work the camera without the macro option (which is for some annoying reason, not working very well!)

Before I go, I want to say thanks to each and every one of you who left comments on my last post - they really do make me feel all warm and fuzzy inside. :)

Enjoy your day!

*********************************
Pearly Thanks card recipe
Cardstock: Bazzil, unknown scraps
Patterned paper: October Afternoon "Thrift Shop"
Stamps: Hero Arts "Poetic Petals", "Tree, birds and messages"
Ink: Martha Stewart
Ribbon: Offray
Other: Sakura Glaze, Prismacolor watercolor pencil, thread

Tools: printer, Cuttlebug, Nestabilities, trimmer, adhesive, scissors, sewing machine, foam squares


6.04.2010

being with you

Hi there!
Quickie post...
I am obsessed with paper piercing right now - I got THIS set from my May HA win with paper piercing in mind. The flower was first on my list to stamp with, and then, these little bees...


The cute bees and the Sugar Pink Boutique-licous ribbon...


And, just like the first card made using these new stamps, I used the 2S4Y sketch.

Instructions:
Cut card base out, as well as rectangle for centerpiece. Round bottom edges of both cut outs. Stamp images twice each onto patterned paper, and cut out. Taking small kraft rectangle, stamp images and sentiment. Adhere cut out images to kraft. Tie bow around card base, than, using foam squares, adhere stamped kraft rectangle. Add half pearl to center of flower.

I used October Afternoon's "Thrift Shop" for the bees and flower, and than "Fly a Kite" for the petals - so sweet, along with that yummy bow.

Thanks for stopping in, and enjoy your weekend!

*******************************
Being with you card recipe
Cardstock: Bazzil
Patterned paper: October Afternoons "Thrift Shop" and"Fly a Kite"
Stamp: Hero Arts "Be Happy"
Ink: Staz-on
Ribbon: Sugar Pink Boutique
Half pearl: Kaisercraft

Tools: scissors, trimmer, adhesive, foam squares

6.01.2010

Hi There!

Hello! 
An SSC Card challenge card for you today, made quite some time ago, when I was still trying to figure out why my camera isn't working on the macro setting, so the photo is kinda crummy.

This bow - something I've never done. Putting a button on top of an image on top of a bow...


Instructions:
Cut out the patterned paper and use foam squares to adhere it to card base. Then cut out the tag from the notebook paper, using a pen to leave an outline inside. Stamp the sentiment and add the cut out the rub-on flowers to the tag. Tie the bow, and add the epoxy sticker with button. Adhere the half pearls to the paper and rub-on flowers.

That's all for today. Thanks so much for stopping in, and for all the sweet comments - I really appreciate each and every one! :)


***************************

Hi There! card recipe
Cardstock: Unknown
Patterned paper: Chloes Closet by Making Memories
Ribbon: Offray
Stamp: Hero Arts "Thinking of You messages"
Ink: Martha Stewart
Half pearls: Kaisercraft
Other: rub-on, epoxy sticker and twine by Making Memories, button from Joanns, black pen

Tools: adhesive, foam squares, trimmer, scissors, pencil